If you are the proud owner of a fashionable iPhone phone, then most likely you want to know how to transfer photos from your iPhone to your computer or laptop. For users who take a lot of photographs, it is extremely important to transfer photos from this phone to your PC or laptop from time to time.
Video tutorial: Transfer photos from iPhone to computer
First thing connect iPhone to computer using a standard USB cable. Insert one end into your smartphone and the other into a free USB port on your computer.

After a few seconds, Windows will automatically install the driver needed for operation and detect our iPhone.
1 way to transfer photos from iPhone to computer
Open the Computer section and find the phone icon. Usually the icon has the iPhone name, which was set in the settings.

To transfer all photos from your iPhone to your computer, you need to right-click on the smartphone icon and select Importing images and videos.


There it is important to configure the folder into which the photos will be uploaded. There is no need to touch anything else there. Click OK and Next.


In the next window, you can uncheck those photos that do not need to be transferred to your computer. Now click Import.

The photos will be saved in the folder we selected. When the operation is completed, it will automatically open.
2nd way to transfer photos from iPhone to computer
You can upload photos without importing by selecting only a few of them. For this No need right-click on the phone icon, or simply double-click to open the folders and find the photos you need.
You need to select the photo, right-click and select Copy.

Now open the folder into which we want to send the photo and call up the context menu and select Insert.

After you have double-checked and made sure that the photos were successfully saved to your computer, you can delete them from your phone. This is, of course, optional!
These are standard ways to transfer photos from an iPhone to a computer or laptop. But besides this, you can also use third-party programs.
3 way. Transfer photos from iPhone to computer using iTools
There is a wonderful Chinese-made program called iTools. It can perform various functions, including using it to transfer photos from iPhone to computer. I downloaded iTools on this forum. Among the unofficial assemblies there is a Russian-language Portable version that does not require installation.


Launch the program and connect the iPhone to the computer.

In iTools, go to the Photo section and the Photo tab too. Here we can view photos by double-clicking them, and also save them to our computer. Check the boxes for the photos you need and click the Export button.

Now specify a location on your computer where you can save the photos.

Pay attention to the adjacent Albums tab. By switching to it, we can download entire albums with photos from our iPhone.

The functionality of the iTools program does not end there. Using it, you can not only transfer photos from your iPhone to your computer, but also here you can install and uninstall programs, upload music and videos, make a backup copy of your device, download firmware, and the like!
If you use other schemes to transfer photos to your computer, then tell us about them in the comments.
That's all, I wish you good luck!
In recent years, it has made tremendous progress: even the very first models of Apple smartphones took very decent pictures, but the latest ones are quite impressive with their photographic capabilities. What is the technology worth? Live photo, available on iPhone 6 and 6S?
However, for the outstanding quality of photos, users have to pay with the free memory of the gadget. A live photo alone weighs about 4 MB, and users bring hundreds of them back from vacation. iPhone owners every now and then have to transfer photo albums from the device’s memory to the computer. Fortunately, this is quite easy to do.
Users who frown in disgust at the word “ iTunes", should be happy with the fact that you can transfer photos from iPhone to computer without using this program. Actually, most iPhone owners use this method - no need to worry iTunes without good reason.
To download photos to your PC, you will need a USB cable. After you prepare it, follow the instructions:
Step 0 (preliminary)). Create a folder on your computer where you will send the photos and remember its location.
Step 1. Connect your smartphone to PC with a cable.
Step 2. Wait a few seconds for the computer to detect your iPhone. After you hear the sound characteristic of a USB connection, you can proceed further.
Step 3. Select the photos you want to download to your computer and drag them into a pre-prepared folder.
You can also transfer images to a Mac through other programs, for example, iPhoto or Aperture, however, this software is not built-in - it must be installed separately.
Uploading photos via iTunes
Transfer to computer via iTunes You can only use photos that were downloaded to the device’s memory in the same way. In the application " Photo» albums with such photographs are marked with the caption “ From my computer».
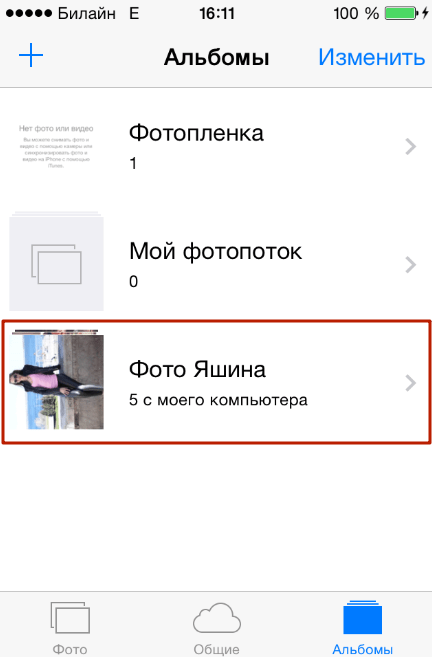
Camera photos cannot be exported via iTunes.
If necessary, send the photo back to your computer via iTunes proceed like this:
Step 1. After connecting your iPhone to your PC, run iTunes.
Step 2. Go to the gadget control menu - to do this, click on the icon with the image of a smartphone.

Step 3. In the block " Settings» select the tab « Photo».

Step 4. Make sure that opposite “ Synchronize" there was a tick. If it's not there, install it.

Step 5. In field "Copy photos from:" Press " new folder"(someone will have - " Images"). In the drop-down menu you need to select “ Select folder».
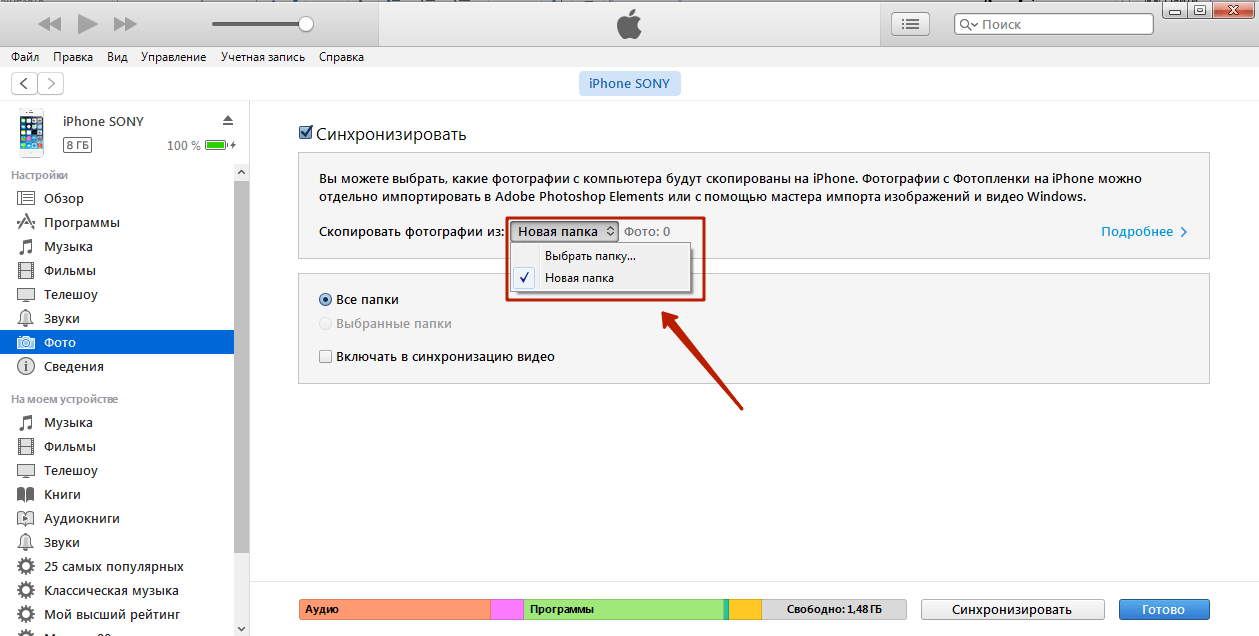
Step 6. Find the folder on your computer from which you downloaded photos to your iPhone’s memory and select it.
Step 7. Click the button Synchronize" and wait for the operation to complete.
There is another, unpopular way to get through iTunes photos stored on iPhone – extract from backup.
All local copies of data are stored in computer memory: for example, on Windows 7 they are located at Start usernameAppDataRoamingApple ComputerMobileSyncBackup, and on Mac - at usernameLibraryApplication SupportMobileSyncBackup. The backup copies in the computer folder look something like this:

To work with backups iTunes you need special software - say, a utility will do iPhone Backup Extractor, which you can download. The need to learn new software is the reason for the low popularity of this method.
Uploading photos via cloud storage
Use (such as Google Drive, Yandex.Disk, Dropbox) is the fastest option to transfer a large number of photos from your device to your computer. However, this method has a significant flaw: mobile applications of almost all cloud storage systems are installed only on iPhones with iOS versions older than 8. Owners of iPhones of the 4th modification will not be able to count on this method, because iOS 8 is not installed on iPhone 4 at all, but on 4S – works with a creak.
The method is very simple - let's look at an example Dropbox:

This should be the result:
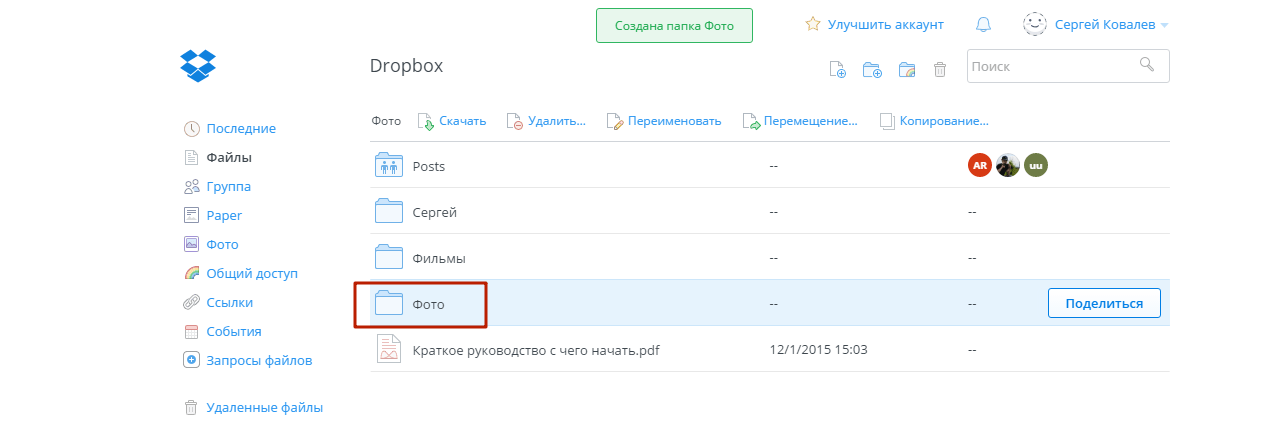
Step 2. Download Dropbox from the App Store and log in with the same registration data.
Step 3. Open the folder " Photo" in the mobile application and through the button " Download» Post photos there.
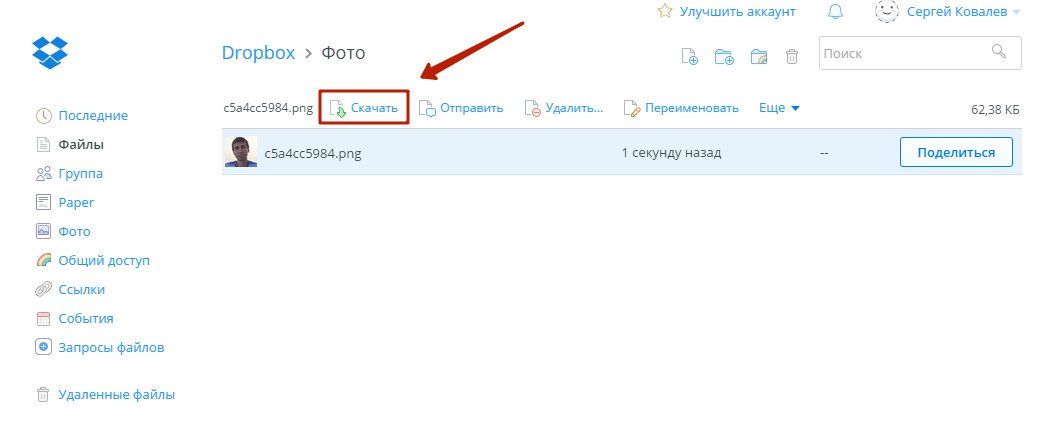
Step 4. Return to your computer and open the folder " Photo" On him. You will see that the iPhone photo is inside.
Step 5. Click the button Download" and wait a couple of seconds for the download to finish.
About cloud storage Google Drive And Dropbox is described in more detail. Users of devices with iOS 8.1 can consider the application as an “intermediary” iCloud Drive, which is installed on iPhones by default, however, this application has a significant disadvantage compared to other storage devices - there is very little free space.
Uploading photos via email and other methods
If you have email configured on your iPhone, you can transfer a photo to your computer in just a few simple steps:
Step 1. Go to the application " Photo» and find the photo you want.
Step 2. Click on the arrow icon located in the lower left corner.


Step 4. In the menu that appears, click on the “ Mail" A photo will be attached to the email.
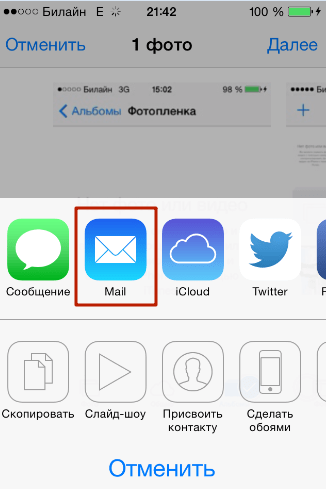
Step 5. On the next screen, enter the email address to which you will send the letter. You can use a mailbox that belongs to you, but is registered on another service - it is now common for one person to have several mailboxes.

Step 6. Click " Send».
Step 7. A message will appear reminding you that you are sending an email without a subject - confirm your intention by clicking " Send».

Step 8. Go to the mailbox where you sent the photo from your computer and download the image.
In addition to email, you can use any of ( In contact with, Facebook): you just need to send an image via message from your smartphone, then open your message history on your computer and download the image to your hard drive. However, this method is only suitable if you need to download a small number of images - in one message " In contact with» a maximum of 10 photos can be placed.
Conclusion
Transferring photos and videos is the only operation related to the exchange of data between iPhone and computer that does not require launching iTunes. When connecting an Apple gadget via USB, the iPhone is detected as a digital camera, which allows the user to copy pictures from the device’s memory to the hard drive directly. However, even if there is no USB cable at hand, an iPhone user has a lot of options for how to transfer photos to a computer - to do this, he can use his email or social network account.
iPhone smartphones are famous for their camera quality. In order to upload your pictures to a computer running Windows OS, you will need to do the following.
Connecting iPhone to the USB port of a PC or laptop using the USB cable usually included.
After some short time automatically drivers will be installed and the device will be detected.
There are 2 ways to reset photos.
First - click on icon smartphone with the right key and select “ Importing images and videos».

In the window that opens, take your time to import your files. First of all, open Extra options.
Here follows tune the directory where the photos will be uploaded. 
In the next window you can put away checkboxes from those photos that do not need to be transferred to the PC, then click Import.
Photos are saved to the directory of your choice. 
Upon completion of the procedure, the folder is automatically will open.
Second way - open subfolders by double-left-clicking on the phone icon. Usually images are saved in a folder called DCIM. 
We simply copy the necessary images from there, selecting them and copying them to the PC. 
Transfer photos to MacOS
Connect the iPhone to the PC and open Spotlight in the upper right corner of the screen, or using the combination “ Ctrl+Space». 
We need a utility Image Capture. Enter its name in the search. 
In the window that opens, you will see a list of your photos and videos from your iPhone. 
You can import all at once by pressing the appropriate button. Or by left-clicking only the files you need.
Select folder, where the files will be imported. 
We recommend that you uncheck the “ Delete after import"If you don't do this, all the files you imported will be deleted from your iPhone. 
Using iTunes
iTunes has the option tune photo synchronization using the program " Photo"or from a directory on your PC. When syncing your iPhone with iTunes, photos and videos on your iOS gadget are updated according to the content of albums on PC.
Launch the iTunes interface window, click on the smartphone icon.
Then go to the section Photo.
Check the box " Synchronize».
Select a directory or software as a source for synchronization.
If a directory contains subfolders, their top level will be displayed on the device as albums. 
Then press the button " Synchronize" and wait for this process to complete. 
You can connect the device either using a wire or via a wireless Wi-Fi network. To do this, before you start transferring photos, you will need to make synchronization via Wi-Fi.
In iTunes under " Devices» select your iPhone. Further in the section Review in field Options check the corresponding box. 
Start synchronization from your smartphone using Device settings. On the menu " Basic» check « Sync with iTunes over Wi-Fi"—after this the device will be automatically synchronize with a computer or laptop via Wi-Fi if they are on the same network. 
Transfer via cloud storage
You can view your photos in iCloud (and you can save more than just photos) without using your iPhone.
Install the iCloud utility on your PC. Installation is simple, similar to most other programs. Once launched, click on the item in the upper right corner - Recover from iCloud Backup File.
Enter your Apple ID and password, then click the arrow next to the password input field. 
After checking the correctness of the entered information, the program will provide backup copies that were linked to your account. Download the desired one by clicking Download next to it. 
After downloading, you will have the opportunity to view the entire amount of data, including photos. 
To restore the photo, click right click by the directory containing them and select Recover checker, which will restore all files.
This method will work if at least one backup copy is stored in the cloud.
We send it via mail
To send photos from your Apple gadget, you can use email; of course, for this, it must be configured on your iPhone.
Go to the application " Photo» and select the desired photo.
Click click on the arrow icon in the lower left corner, and then Further.


There you will see an icon called “ Mail" by clicking on her photo will attach to an email. 
At the next stage, enter your email address where the letter will be sent.

Click the button Send", then on your computer you can easily download the attached files by opening the corresponding letter.
In the same way, you can attach a photo file to a message from one of the social networks you use (VKontakte, Facebook, etc.). Then, with your profile open on your computer, download the images to your hard drive.
Reading time: 8 minutes
In this article, we have described for you 6 ways to quickly transfer photos from iPhone to laptop or computer. Choose the right one.
The iPhone is capable of taking high-quality photographs, so the device is often used as a full-fledged replacement for a digital camera. To avoid filling up your phone's memory, photos should be regularly transferred to your computer's hard drive.
Some users may experience certain difficulties at this stage, since the process of transferring photos from an iPhone to a computer or laptop requires certain knowledge about the phone and its interaction with the PC. Nevertheless, there are quite a few ways.
Using iCloud Photo Library
With this tool, photos from your phone will be available not only on MAC, PC, but also on iPad, Apple TV, iPod, etc.
Preparatory stage for MAC:
Photos moved to iCloud take up a certain amount of space in the cloud. So make sure you have enough online storage for all your photos.
Preparation for PC with Windows:

The location of the upload and download directory can be changed using the “Photo Sharing” and “My Photo Stream” items. When connected to Wi-Fi, now all photos from the iPhone will be synchronized with the PC and deleted from the phone’s memory.
Transferring Photos via iTunes
iTunes is not directly designed to work with pictures, but it is possible to transfer them to your hard drive using the built-in tools of OS X. Previously, on MAC, this task was handled by the iPhoto application, which automatically launched when the iPhone was connected to the computer. Photos were sent to iCloud, where they were synced with all other devices.

Starting with OS X Yosemite, the role of iPhoto was taken over by the Photos application, which has wider functionality compared to the old tool. It is more tightly integrated into iCloud. In order for all pictures to be automatically redirected to cloud storage, you need to select the corresponding item in the settings.

Photos can use all the libraries created in iPhoto, so MAC owners won't feel the difference. Moreover, iPhoto has not disappeared from the Applications folder - you can still use it:
- select the desired graphic content to transfer to your laptop or PC,
- Click on the “Import” button.
Once the process of transferring photos to your computer is complete, you can delete them from your phone to free up memory.
Using the Image Capture app for MAC
Even if the connected iPhone is not recognized by the MAC as a drive, using the Image Capture utility it is not difficult to transfer photos from your phone to your computer:
- Connect iPhone with original USB cable to MAC computer.
- Launch the Image Capture utility.
- Select your photos and click Import.

To select multiple photos at once, press Command. Next, all that remains is to indicate to the utility the directory for saving photos and start the copying process.
An easy way to transfer photos for Windows
iTunes can be installed on any Windows if desired, and you can synchronize your iPhone with your computer in the same way as if it were a MAC. But since the Microsoft system is able to detect any phone, including the iPhone, as a physical media, it is easier to work with it as with a regular drive. For this:

If necessary, you can copy the entire DCIM folder with images to a computer disk.
Transfer photos to PC from iPhone via Wi-Fi
To transfer pictures from iPhone to computer, it is often convenient to use a wireless connection. To do this, you need to synchronize your phone with your computer:
- Connect your iPhone with a USB cable to your computer;
- Open iTunes (on a Windows PC, you need to install the application yourself);
- In the "Devices" section, select your connected iPhone;
- In the top menu ribbon, click on the “Browse” button and in the block with the selection of parameters, check the box for synchronizing the device via Wi-Fi.

Apple products are famous for their cameras and high-quality photographs, which sooner or later fill the device's memory to the limit. This is why users need to transfer photos to their computer. In this article we will describe possible ways to transfer photos and videos to a computer.
Via USB cable
To copy a photo to a computer via a cable, connect your iPhone or iPad to the computer, after a few minutes you will see an auto-upload window, in this window you need to select “open device to view files.”

If startup does not happen, then you need to go to “my computer” and open the iPhone as a portable device or as a camera, depending on the version of the operating system.

If you connect your iPhone to your computer for the first time, a message will appear on the iPhone screen with the question “Trust this device?” If you want to transfer photos, then we answer positively.
Then, by double-clicking the mouse, open the folder in which the contents are displayed and then open the “DCIM” folder. The contents of the folder are divided into several more folders that contain your photos and videos. Here you can select the photos you need and transfer them to a folder on your computer.
Using cloud services
A great way to send files to your computer if you don't have a USB cable. You can use the native cloud service iCloud. First, you need to activate this function in your phone settings; there is a separate iCloud item there. If you haven't signed in to iCloud yet, you'll need to sign in using your Apple ID account. In iCloud settings, you need to enable the “upload my photo stream” option. This way, your photos and videos will be uploaded to the cloud, but it will take some time, and you will be able to access them from any device. 
To download photos, you need to go to https://www.icloud.com/ from your computer. Here again you need to enter your account information. Click “photo” and mark the photo for downloading, then click the “download” button, this is an icon in the form of a cloud with an arrow, the selected photos will be downloaded to your computer.

The disadvantage of this method is the need to connect to a wi-fi network; photos are uploaded to the photo stream only with this type of Internet connection.
You can also use any other available cloud storage for the same purpose. Upload your photos to Google Drive, OneDrive, or DropBox, then open the storage site on your computer and download the photos you want.
If you have a small number of images, email or social media may be suitable.