A standard keyboard usually doesn't need any special setup to work in Windows 7: to start using it, you just need to connect it to your PC. But, as with any device, problems sometimes occur with keyboards. Most often this is a complete or partial failure, as well as incorrect operation. In addition, some users find the default keyboard setting inconvenient and want to change it.
We have prepared a story on how to troubleshoot your keyboard yourself and how to configure it for more convenient use in Windows 7.
The most common types of keyboard problems and methods for resolving them
- The keyboard doesn't work at all.
- Windows 7 does not recognize the keyboard.
- The keyboard works, but the wrong characters are printed when typing.
- The keyboard does not respond to pressing individual keys.
- The system does not recognize keyboard shortcuts.
The keyboard does not work, is not recognized by the system, the indicator lights do not light up
This problem indicates that the device is not connected to power or is faulty. To exclude the first reason:
- connect the keyboard to a known working USB or PS/2 port of the computer without adapters and other “intermediate” devices (connection to PS/2 can only be made when the power to the system unit is turned off);
- make sure the connection is secure.
If the keyboard still does not show signs of “life,” it is likely that the keyboard itself is faulty or its cable is damaged.
This condition of the wireless keyboard may indicate a discharge or lack of batteries.
The keyboard does not work exclusively on Windows. It works before the system boots, as well as on other computers
The keyboard is working, but does not work due to a system failure. The reasons may be:
- driver problems;
- blocking the device with software;
- viral infection;
- changes in the registry and damage to system files.
If the problem did not occur immediately after installing Windows 7 (the keyboard worked fine on this computer before), try removing its driver:
- open Control Panel -> Device Manager;

- Find the keyboard in the list, expand its context menu and select “Delete”.

- restart your computer.
These steps will help Windows 7 re-recognize the connected device and reinstall it.
Other mentioned problems with Windows 7 and programs that caused the keyboard to fail can be fixed with a system restore. To do this, go to Start, expand All Programs ->> Accessories ->> System Tools and click “System Restore”.

Select an appropriate checkpoint that was created before the failure date.

Confirm your intention by clicking the “Done” button.

Wait for the recovery to complete. All changes, which include installing and configuring software, adjusting the registry, installing Windows 7 updates, etc., will be canceled, and what was blocking the keyboard will no longer work.
If the possible cause is a virus infection, scan the system.
Windows 7 does not “see” the keyboard. It is detected as an unknown device
This often happens with non-standard keyboards that use their own drivers. Installing the required driver from the disk that came with the keyboard upon purchase or from the manufacturer’s website will help solve the problem.
The standard Microsoft keyboard driver can be downloaded from here.
Keys cannot be pressed or different characters are printed
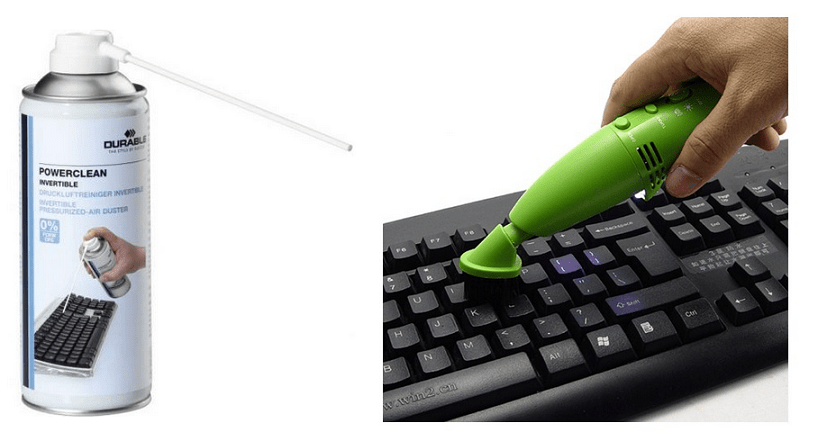
Most often this is the result of the keyboard getting dirty and liquids getting inside it. You can clean the device from crumbs and other debris that accumulates under the keys using a special vacuum cleaner or a can of compressed air.
If the keyboard does not work after liquid has entered it, it must be disassembled, washed and dried.
If a problem similar to this occurs when connecting any keyboard to the computer, the source of the problem may be the port (PS/2 or USB) or the motherboard.
The functionality of individual keys can be checked using test applications, for example MS Key, which is included in the Microsoft IntelliType software suite, or online services Key-test, Keyboard Tester and the like.
Some keyboard shortcuts don't work
The reason for this is often third-party software for controlling the keyboard. Moreover, the application does not necessarily work on your system; perhaps it was installed before and was removed incorrectly. Sometimes the problem is caused by incorrect configuration of such programs.
To check this version, start Windows 7 in safe mode (programs from the startup list will not start under it). If the keyboard works normally, the assumption is correct.
Configuring Keyboard Settings in Windows 7
Layout settings
In the notification area on the taskbar, click the input language button and select the layout you want.

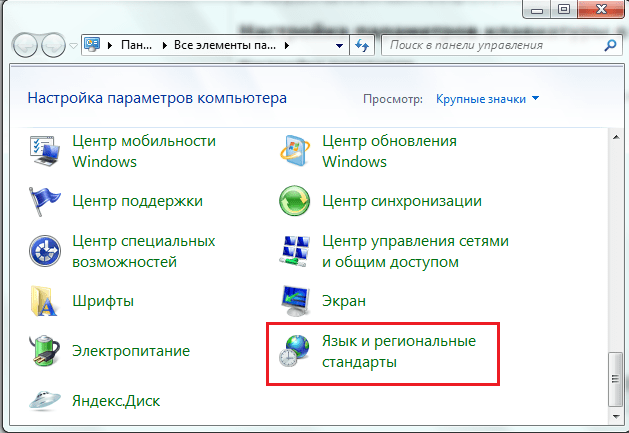
Or press a specified key combination. If you don't know it, open the Windows 7 Control Panel ->> Regional and Language Options.
On the “Languages and keyboards” tab, the “Change keyboard” option is available. Click the button.

In the “Switching keyboard” section, the key combination that changes the layout settings is indicated.

Set the delay before entering characters, input speed, and cursor blink rate
Open the Keyboard app in Control Panel.

Character input options in Windows 7 are located on the “Speed” tab. Move the sliders to find the settings that work best for you. You can check how this works in a special input field in the same window.

Here, below, you can set the cursor blinking frequency when entering text. It can also be changed by moving the slider left and right.
As you know, most PC and Mac computers or laptops use standard keyboards with preset key layouts and language layouts. For many users, for example, when changing the operating system or the hardware itself, it can be quite difficult to get used to the new position of the buttons. In this case, you can reassign them so that they correspond to the layout to which the user is accustomed. But most often this applies only to those situations when, when entering text, the user does not look at the characters, but uses the so-called
Why is it necessary to reassign keys on the keyboard?
But the matter is not limited to the above situations. Quite often you can come across cases where a key on a computer or laptop is out of order.
In the case of standard equipment in the form of PS/2 keyboards, the issue can be resolved quite simply by simply purchasing a new one. But what to do if a breakdown occurs on your laptop - it’s not a cheap pleasure. Here, as an alternative, you can simply reassign the keys on the keyboard, abandoning rarely used buttons. However, you can also encounter even more primitive situations when it is necessary to change combinations corresponding to switching languages and layouts.
How to change keyboard shortcuts: Windows Tools
First, let's look at the simplest option related to language layouts. By default, all recent Windows systems use the left Alt button in combination with Shift to change the language. But many users prefer to change the language and layout using the Ctrl/Shift combination, considering it more convenient.

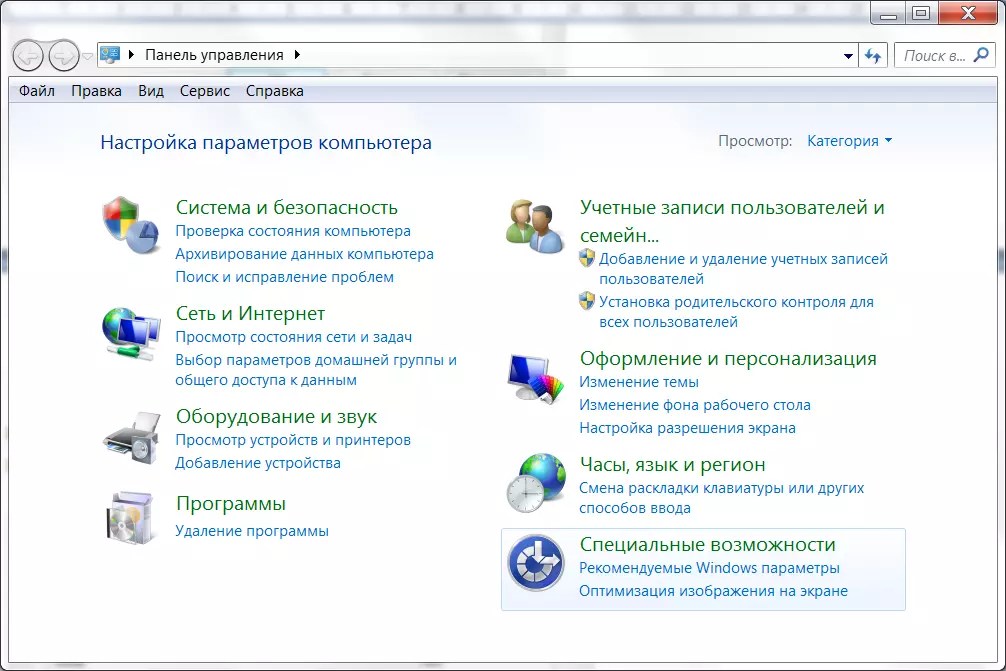
To change the switch, you must use the standard “Control Panel”, in which you select the language section (Windows 10) or languages and regional standards (Windows 7, for example). Next, you go to additional parameters and select changing the language bar keyboard shortcut by pressing the corresponding button in a new window, after which you simply specify the Ctrl/Shift combination from the list.

In principle, you can reassign the keys for changing a character or action using a small keyboard and mouse control program called Layout Creator, which can be downloaded directly from the Microsoft website. After starting the application, it is enough to select a list of all actions, and if necessary, change them for each individual button, up to completely disabling the keys. You can also change the assignment of operating keys like Shift, Alt, etc.
Reassignment via the system registry
You can also reassign keys on the keyboard using a more complex method without using third-party utilities, using the settings and parameters of the system registry, the editor of which is called by the regedit command through the “Run” console.
Here you need to find the KeyboardLayout directory in the HKLM branch through the SOFTWARE directory. Here you will have to create string parameters indicating button codes for reassigning from one key to another. The process is quite labor-intensive, so it will not be useful to most users, since without knowledge of the reassignment, disabling codes and the order of entering characters, it will be quite problematic to perform such operations. The methodology is simply given for the general understanding that this can also be done in the registry.
Most Popular Third Party Apps
But suppose the user's keyboard Shift or some other key does not work. It is much easier to reassign using special applications that are designed just for this.
Among the many programs of this type, the following are particularly popular and are distinguished by the ease of performing the necessary operations:
- MapKeyboard;
- SharpKeys;
- MKey.
MapKeyboard
This program allows you to reassign keys on your keyboard as quickly and easily as possible. After starting the utility, an on-screen keyboard will appear.

Let's say you need to reassign a button or Shift. On the (virtual) keyboard, press the desired button, select a new symbol or operation of another key through the Remap selected key line, and then save the settings by pressing the Save Layout button. Upon completion of all actions, a system reboot will be required.
SharpKeys
Here is another simple program. The procedure is almost the same as in the previous case. First, a key is added (Add), then a new character or action is selected from the list (complete shutdown - Turn Key Off), after which the changes are saved by pressing the Write To Registry button, and then, again, a complete restart of the system is performed.

The only and most important problem with this utility is that it does not work with and reassignment of Cyrillic characters must be done using their counterparts in the English layout.
MKey
Finally, another small application (this time in Russian) that allows you to reassign any button and even change standard combinations or set your own combinations.

As usual, the original key is first added, then the press emulation line is used, the letter or action of another key is selected from the list, and the changes are saved by clicking on the button with the image of a floppy disk. By the way, this program differs favorably from the two previous ones in that it allows not only reassigning keys, but can also be used when setting up various kinds of manipulators, gamepads, or actions with software players.
Conclusion
That's it for reassignment operations. In principle, depending on the situation, the system's own tools can be used. In the literal sense, you can only reassign standard combinations that were initially included in the OS parameters. If you do not use third-party utilities, you will have to deal with the system registry, but this is quite difficult. Therefore, if the question arises of quickly carrying out all the necessary operations, it is better to give preference to the applications described above. And the MKey program (short for Media Key) in this regard looks more convenient in all respects, only it constantly “hangs” in the system tray. But its resource consumption is minimal, so this will not affect the performance of a computer or laptop.
The simplest solution to setting up a keyboard on a computer is to use WINDOWS.
There are three ways to connect a keyboard to a PC:
- You can use a standard PS/2 connector.
- Using a USB port. In this case, the operation of the device will correspond to the operation of the keyboard connected to the PS/2 port.
- Wireless method. It is only possible after the system has started. You will be able to use the keyboard after the special driver is loaded.
It is important to remember that before inserting the PS/2 keyboard plug into the computer, you must disconnect the power from the PC. Otherwise, you will render the motherboard unusable.
Now you can start setting up.
Basic settings in windows 7

It is important to remember that fast computer skills do not come on the first day. Only over time, gaining experience, the user acquires keyboard input speed. Therefore, setting it up will be much more difficult for beginners than for advanced users. First of all, you need to understand where the keyboard settings are on the computer.
Standard procedure:
1. First of all, for greater convenience of working with the keyboard, you should correctly make the following settings: delay before repetition and character repetition speed. To do this, go to the "Start" menu - "Keyboard". You will see a "Properties" window where you can make the necessary initial settings for the keyboard on your computer.
2. Setting the keyboard speed. One of the features of the keyboard design is that when you press any of the keys for a long time, the character depicted on it will be printed on the screen for as long as you keep this key pressed. This parameter is adjusted using the slider. Find "Speed" and set the replay speed settings as needed.
As a rule, for beginners it should be smaller, and for an advanced user, accordingly, larger. Thus, the delay should be longer, the less experience the computer owner has.
To do this, in the “Repeat signal” section, click “Delay before repeating”, where you determine the time after which the character you pressed will begin to be entered again. Next, in the “Flicker frequency” section, set the required frequency. To check the installed settings, a special device properties dialog box is provided. After making all the necessary changes, click OK.
3. Language settings. You need to check which input language is installed on your PC. To do this, load the operating system and look at the language indicated on the layout sign (default). To do this, click on the language bar icon. After that, click "Options", then "Default input language" and "More details". Now select the desired language, which will become the default language and click "OK". If the language is English, change it to Russian.

In the "Options" section, make additional settings: the key with which Caps Lock will work; Simultaneously pressing which keys will switch languages. Typically these are the Alt and Shift keys. For additional language settings: hieroglyphs or writing options (from left to right), click: “Start” - “Control Panel” - “Switch to classic view” - “Standards”. Next - “Language” - “Text input services”, then “More details”, and then make the settings.
4. You also need to configure the mouse settings: click “Mouse”, then “Pointer Options” will appear, where you need to specify the desired cursor movement speed. If you have poor eyesight, you can connect a special option that allows you to display the trail of the pointer. If you have a laptop, you should perform touchpad settings. It is important to remember that they can only be seen in the "Mouse" section after installing certain drivers.
5. While working with a computer, connect “ClearType”: go to the “ClearType Settings” item, check the “Enable” checkbox, now you can launch the settings to select the desired method of displaying text. This option greatly improves the quality of text images.
Read this article on how to return your computer to factory settings. How to set up a tp link router - here.
Differences in setting up Windows XP

Setting up the Windows XP keyboard differs insignificantly, so we will only indicate the differences: The key combination used to switch the language is configured in Windows XP in the control panel as follows: “Start”, “Control Panel”, “Regional and Language Options”. A window will open, find “Languages” in it, then “More details”. Another window will pop up in which you need to disable CAPS LOCK and change the keyboard shortcut by clicking “Change shortcut”, then select the required keys and click “OK”.
If the keyboard refuses to work

How to set up a keyboard on a Windows 7 computer:
1. If the keyboard is not recognized by the operating system and the special indicators do not light up, this means one of two things: either the keyboard is disconnected from power, or it is simply faulty. To fix these problems, you should connect the device to PS/2 and USB (without adapters). If the keyboard still does not work, it means that it is truly faulty or its cable is damaged. This problem may be a consequence of discharge or lack of power supplies.
2. If the keyboard is faulty only in Windows 7, but before that it worked fine. It does not function due to system failures; the reasons may be: the keyboard is blocked by software, a virus, a driver malfunction, registry changes, or problems with system files.
If this started some time after installing the system, you need to remove its driver. To do this, click "Device Manager" in Control Panel. In the list that opens, click "Keyboard", open its menu, then select "Delete". Restart your computer. Setting up the keyboard in Windows 7.
Other Windows 7 problems can be fixed using system restore: click "Start", then open all programs ("Accessories", "System Tools", "System Restore"). Now select the required control point that was installed before the failure. Be sure to wait until the recovery is complete.
Thus, all changes: installation, registry and software settings, operating system updates will be canceled and everything that caused the keyboard lock will no longer work. If the problem is caused by a virus, an antivirus will help you.
3. The operating system does not see the keyboard and recognizes it as an unknown device. Usually, this happens with non-standard models that have their own driver. In this case, use the driver installation from the disk included with the keyboard or on the manufacturer’s website.
Read also: - Creating a gmail account means discovering the world of Google - A program for setting up sound on a computer - tips and tricks - How to set up a printer on a computer - How to set up Skype on a computer - Remote computer setup - what is included in the list of services? - How to adjust sound on a computer
←Return
domaster.su
Secrets of setting up the keyboard on your computer
 It is not enough to connect an input device; You also need to know how to set up the keyboard on your computer to make working with it as comfortable as possible. From our guide you will learn which hardware parameters are best to set and how this will affect the operation of the system.
Equipment setup
In a short instruction on how to connect a keyboard to a computer, we have already discussed some issues of setting up this input device, but adjusting the operating parameters was touched upon only briefly. Let's take a closer look at the hardware setup stage and see how you can slightly change the configuration of the connected keyboard.
Basic setup
Let's start with the basic settings that can be configured in the "Keyboard" section located in the "Control Panel".

Let's start with the first tab - here you can see several sliders that are responsible for the speed of entering a repeating character and the frequency of cursor flickering.
With the Delay Before Repeat Start and Repeat Speed options, you can specify how quickly the same characters will repeat when you press and hold a key.
You can check the configured parameters in a special line. The cursor blinking frequency is also shown here, which you can also set manually - from complete stillness to high-speed blinking. 
With the “Equipment” tab, everything is simpler: connected devices are displayed here, for which you can view or change the properties. 
In the keyboard properties you can:
- View the device status (working normally).
- View driver information, update it, or remove it.
- Assign some power settings - specify that the keyboard can be used to wake the computer from sleep mode.
The last feature is not available in all versions of Windows, but it is not of decisive importance, so there is no need to worry about it.
language and regional standards
Pressing a key only sends a certain signal to the computer. The keyboard driver interprets it. That’s why it’s so important to set up a layout, which is a set of rules for interpreting received signals.
Available layouts that correspond to the alphabet of a specific language are displayed in the notification panel. Sometimes users are faced with the fact that the layout is not visible; in this case, you need to restore the language bar on the taskbar.
Right-click on the language bar and select “Options” (or launch the “Run” menu through “Start” and enter the command “control intl.cpl,2”).
The Regional and Language Options window will appear on the screen under the Languages and Keyboards tab. What you are interested in here is the “Change” button - click on it to start setting up input device parameters. 
A new dialog box will open in which you will see three tabs. Let's look in detail at what settings are available in each of these sections.
Are common
The “Input language” line indicates the layout that is automatically installed when the computer starts. You can install any of the available languages by selecting it in the pop-up list and clicking the “Apply” button. 
On the same tab you can install an additional layout. Click the Add button and select a language. Expand it, specify the input method and click OK.
Using the “Show” button, you can open a virtual image of the keyboard with the new layout to see which button will be located where.
The system now has three layouts installed that you can switch between. To get rid of the excess, select it and click the “Delete” button. 
To save the changes, be sure to click the “Apply” button. Then you can move on to the next tab.
Language bar
Here you can configure the settings for the language bar, a small window that allows you to see what layout is installed and change it if necessary.  There are not many options for customizing the language bar. It can be hidden, pinned to the taskbar, or placed on the desktop where you can move it freely.
It is convenient when the language is displayed on the taskbar, so it is recommended to select this option.
The remaining parameters are responsible for some features of the display of the language bar. You can leave them unchecked by default or experiment a little - they do not carry any functional load.
Switching keyboard
On this tab, you can configure how to disable Caps Lock mode, in which all letters entered in the text are printed as capital letters.  The mode can only be activated by pressing the Caps Lock key, but you can disable it, for example, by pressing the Shift button.
If you don't feel comfortable switching languages, change the keyboard shortcut.
Click the "Change" button. 
Set a convenient combination and click “OK”.
Remember that language and layout are not always the same. There can be multiple languages on the same layout, so you need to assign functional keyboard shortcuts for both cases.
Keyboard problems
We have sorted out the setup, but there is one more important point left - correcting possible problems. Most often, users encounter the following problems:
- The system does not recognize the hardware or the input device simply does not work.
- When typing, the wrong characters are printed.
- Individual keys or their functional combinations do not work.
This is the most general description of the problems, but it covers the vast majority of special cases, so you can definitely find a solution for yourself here.
Hardware and system problems
The system does not respond to button presses, the indicator lights on the keyboard do not light up - these are signs that the device is not connected correctly.
- Make sure that the connection is made into a known working connector. Try installing another device into it.
- Make sure that the equipment plug is fully inserted into the socket. Also check the cable itself - it may be damaged.
Try connecting the keyboard to a TV or, for example, a tablet - if the device is detected and works normally, then the problem lies in the computer.
If the keyboard worked for a while, and then the system stopped detecting it, try simply restarting the computer. The next step is to reinstall the drivers.

The next time you start, the system should automatically detect the presence of a new connected device and install it. Don't forget to install the drivers if they are supplied on disk or distributed through the manufacturer's official website.
Sometimes the cause of incorrect operation of connected equipment is a virus infection of the computer. Scan the system for threats and neutralize them.
Problems with keys and their combinations
If, when typing, you see on the screen characters that are not the same as those you are typing, then most likely the keyboard is dirty or there is liquid inside its case. To clean the input device, you can use a special small vacuum cleaner or a can of compressed air.
An economical option is to turn the keyboard over with the buttons facing down and gently tap one corner on the table. If you have never done this before, you will be unpleasantly surprised by the amount of various garbage that ends up on the table.
The functionality of the keys can be checked using special online tests - for example, Key Test.
If the keyboard shortcuts that you have set in the keyboard settings do not work correctly, make sure that applications for controlling input devices are not installed or correctly uninstalled on your computer.
Often, users install such applications to assign convenient combinations, and then forget about them or simply uninstall them incorrectly, thus confusing the hardware configuration.
To make sure that it is a third-party application that is affecting the functionality of the shortcuts, boot your computer in safe mode and check the keys.
mysettings.ru
Setting up the keyboard on a laptop and computer
Vladislav Nikitin 2012-12-24 windows 7, Computer and userSetting up the keyboard on a laptop and a personal computer is basically no different and depends on the operating system: windows XP, windows Vista or windows 7, 8, 10. In fact, only the “PATH” differs, along which the keyboard properties are called up for further configuration.
The keyboard is configured in the Keyboard Properties dialog box. In windows 7: Start > Control Panel > Keyboard.
Keyboard properties - click to enlarge.
Keyboard properties in other Windows operating systems are opened either through the control panel or by selecting the Properties item in the context menu of the indicator on the Display Panel.
In Windows 7, the keyboard properties window has two tabs: Speed and Hardware. You don't have to configure anything on the Speed tab. Only for those who type a lot of text by occupation, it makes sense to set the minimum delay before repeating characters and the maximum speed for repeating them. Both of these settings affect how quickly characters are entered when a key is pressed and held down for an extended period of time.

Keyboard settings
On the Hardware tab, you can check the “status” of the keyboard.
In order to configure in Windows 7 - Language and its display in the tray, you need to go to: Start > Control Panel > Clock, language and region > Language and regional standards > in the window that appears, on the “Languages and keyboards” tab, click - Change keyboard.

Or simply right-click on the current language display and click - Options, the following menu appears:

Using the “Languages and Text Input Services” tab, you can create different language layouts on your computer. Usually two are used: for Russian and English. Those who work a lot with other languages, such as German, can optionally install German language support. In this case, switching between languages will become more difficult - you will have to go through the layouts one by one.
The keyboard properties window before Windows 7 has two tabs: Speed and Language. You don't have to configure anything on the Speed tab. Only for those who type a lot of text by occupation, it makes sense to set the minimum delay before repeating characters and the maximum speed for repeating them. Both of these settings affect the speed at which characters are entered when a key is pressed and held down for a long time. Using the Language tab, you can create different language layouts on your computer.
To add support for an additional language, click Add and select the desired language from the drop-down list in the Add Language dialog box. Previously, this setup required the presence of a distribution CD with the operating system - at the end of the operation it had to be inserted into the drive, now everything is simple, add it, click apply and you're done.
One of the layouts must be designated as the default. Despite the fact that we type more text in Russian than in English, still make English the default language. This will not at all interfere with typing Russian-language texts, but it will protect against incorrect reproduction of characters in some programs made by domestic programmers (very rarely).
By the way, if you encounter such a defect, you will know how to quickly fix it.
Choose one of two possible ways to switch layouts: either by using the key combination ALT on the left + SHIFT, or CTRL + SHIFT, in the tab - switch keyboard.
Please note that both of these methods work reliably. Of course, there are special programs that allow you to switch layouts much more comfortably, but they need to be checked and tested. If your computer suddenly begins to behave strangely or stops working altogether, ask yourself: “Have I recently installed some great keyboard switch?”
The last thing to do is to check the box - Show language indicator on the taskbar, in windows 7 - Pinned to the taskbar.

With it, you can switch layouts with the mouse (although it is more convenient to do this with a keyboard), but this is not the main thing. The main thing is that you will always see what condition the keyboard is in. When entering passwords that are not displayed when typing, keeping an eye on the layout indicator is very useful.
P.S. The two easiest ways to download music and movies in VKontakte.
abisab.com
How to configure keyboard settings in Windows 7
The mouse is the most convenient hand control device, but it is very inconvenient to use for data entry. The most convenient and effective manual data input device for most programs is the keyboard.
Before working with the keyboard, you should first set up the language selection tools. Many people have to deal with both domestic and foreign materials, which requires entering both Russian and foreign language characters. In particular, regardless of the fleet of programs used, Latin characters are required to work with the command line and to specify Internet addresses.
Keyboard layout
When you press a key, an electronic signal is sent to the computer. The issue of its interpretation, for example, conversion to a character code, is decided by the operating system according to a certain set of rules. This set is commonly called a keyboard layout. Logically, each keyboard layout is represented in the operating system by a software service. So, for example, installing a German language layout means: installing a software service that interprets the signals coming from the keys as characters from the German script.

It is clear that different languages correspond to different keyboard layouts, but even one language can correspond to several different layouts. If necessary, layouts can be quickly changed during work - for this, the operating system provides means for switching layouts.
Of course, a computer used in Russia requires a Russian keyboard layout. It is equally necessary to have an English (“American”) layout, without which there is nothing to do on the Internet. It is also important to be able to work with English-language programs, even if you do not usually use them.
To check which keyboard layouts are present (installed) on your computer, double-click on the "Region and Language Options" icon, which is located in the Control Panel window (Start Control Panel). Give a picture of the icon. Select the "Languages" tab and then click on the More button to open the Languages and Text Input Services dialog box with a single Options tab. If the required layout is not on your computer, you need to install it (add it).

Installing an additional keyboard layout
- Open the keyboard properties dialog box: Start - Control Panel - Keyboard.
- To add a new layout, click the Add button - the Add input language dialog box will open.
- In the Language drop-down list, select the language that corresponds to the keyboard layout you are adding.
- The specific layout is specified in the Keyboard layout or input method drop-down list. When choosing an English layout, you should specify the option: USA.
Many people are attracted to the US-international option, but it is better not to use it. This layout is intended for Western Europe. In it, some two-character combinations are automatically converted into letters with superscripts. Such a transformation is hardly necessary in our country, and it can lead to misunderstandings.
You often need to switch between keyboard layouts “on the go” while working with a program or document. This can be done using the keyboard or MOUSE, but the keyboard is more convenient. The key combination used to switch layouts must be previously specified (selected).
Language bar
The language bar allows you to switch the keyboard layout using the mouse. It is enabled by default and is located on the Taskbar next to the display panel (“collapsed”). The panel can also be placed in any place on the desktop (“expanded”). It contains an indicator showing the current keyboard layout.

The current language is indicated by a button with a two-letter designation. To select a different language, click on this symbol and select the desired language from the menu that opens.
Using the language bar, it is convenient to monitor the current layout, but it is not very convenient to switch it. It is still easier to change the layout using the keyboard.
To customize the language bar, right-click on it. Settings commands are available in the context menu, the content of which depends on whether the language bar is collapsed or expanded.
If the language bar becomes a nuisance, you can close it. To do this, click on the Language Bar button in the Languages and Text Input Services dialog box. Select the Turn off additional text services checkbox if it is cleared.

When actively working with multiple documents, it sometimes seems that the keyboard layout switches by itself. Actually this is not true. It’s just that the operating system very strictly monitors which layout is set in which window. The layout can change automatically when moving from one program to another, because the command to select a layout affects only the active program.

xn----ttbkadddjj.xn--p1ai
How to set up a keyboard on a computer?
The keyboard is one of the most important information input devices into a computer. For example, you can work with a PC without a mouse, but without a keyboard you won’t be able to. The serial interface of the keyboard is usually connected to a special controller located on the system board.
It is very important to know how to set up the keyboard on a computer, since the ease of working with a PC depends, first of all, on the keyboard settings. The keyboard can connect to your computer in three different ways:
- Standard PS/2 connector. Never insert the device's plug into PS/2 while the computer's power is on. This may render the motherboard unusable.
- USB port. A keyboard connected to a USB port operates in almost identical mode to a keyboard connected to a standard PS/2.
- Wireless keyboard connection. This connection method assumes that it will work after Windows starts. After the operating system starts, the wireless driver is loaded and the keyboard is ready for use.
After connecting the keyboard, you should begin setting up.
How to set up a keyboard on a computer - basic option
To begin basic keyboard setup, you need to go to the Start menu/Control Panel. Then select the "Keyboard" tab. Next, the “Properties: Keyboard” window will open. In this window you can make some basic settings.
Adjusting the speed
The keyboard is designed in such a way that when you press a certain key for a long time, the symbol depicted on that key will be displayed several times until you release the key. This setting can be adjusted using the slider in the "Repeat input character" section. The “Delay before repeat start” section specifies the time after which the pressed character will be played again. The Keyboard Properties dialog box contains a text box in which you can try out the settings you entered.
Using the “Repeat Speed” slider, you set the delay time interval before the pressed symbol starts playing again. The Cursor Flicker Rate section determines the frequency at which the cursor symbol flickers on the screen. By moving the slider to the right/left, you set this parameter. After the changes have been made, click "OK".
How to configure language settings
To determine which language will be used by default on the system, you need to right-click on the language bar icon. Select: taskbar / “Options” / item “Default input language” - in this tab, select the required language that will go into the OS by default.
By clicking the “Keyboard Options” button, additional keyboard parameters are configured: which key will enable/disable Caps Lock, which key combination will switch between languages (usually Alt left + Shift is used).

How to set an alarm clock on a laptop in Windows 7
To configure the keyboard, you need to:
Go to the “Start” menu → “Control Panel” → click on the “Keyboard” icon (if the menu is in classic view) or select the “Printers and other equipment” category (if the menu is displayed by category) and then click “Keyboard” → the window “ Properties: Keyboard".
In the "Properties: Keyboard" window, on the "Speed" tab:
- In the “Delay before repeating” item, you can set the time interval after which the characters will begin repeating if you hold the keys pressed. It is recommended to select “Shorter” to speed up typing.
- In the “Repeat speed” item, you can select the speed of entering repeated characters if you hold the key pressed. It is recommended to select “Higher” for faster typing.
- In the “Cursor flickering frequency” item, you can adjust the flickering speed of the text output cursor. There are no general recommendations, act according to your preferences.
After the basic settings are made, close the window with the “OK” button.
Setting language input options
To configure language input settings, that is, set which default language will be used when the computer boots, you must:
Right-click on the keyboard layout language bar icon on the taskbar → “Options” → in “Default input language” select a language.
If you click the “Keyboard Options” button, you can configure additional keyboard parameters (which key to turn on and off the Caps Lock, and also assign the keyboard shortcuts you want to use to switch between input languages - usually used Alt left + Shift).
Note:
If you don't see the Language Bar, right-click an empty space on the taskbar, select Toolbars, and then click the Language Bar button.
To configure additional language support with writing from right to left and writing hieroglyphs, you need:
go to the “Start” menu → “Control Panel” → “Switch to classic view” → “Language and Regional Standards” → in the window that appears, click the “Language” tab → the “Languages and text input services” item → the “More details” button. There you will find the appropriate setting.
Has the mouse failed? Master keyboard control
While the mouse is still functional, practice controlling the mouse pointer using the keyboard.
- Bring up the Start menu by pressing a key Win(window key Windows in the bottom row of the keyboard.
- Using the up, down, left, and right arrows, find “Control Panel” and press the “Enter” key.
- To switch to the Mouse tab in the Accessibility window, use the keyboard shortcut Ctrl + Tab.
- You can navigate inside the Mouse tab using the Tab key. Make sure the “Settings” button is framed and press “Enter.”
- To check or uncheck a box, press the spacebar and use the arrows to move between “on” and “off.”
- When you have everything set up, press Enter, then use the Tab key to navigate to the OK button and press Enter.
Now to enable keyboard pointer control, press the key combination that was specified in the settings window:
“left Shift” + “left Alt” + “Num Lock”(simultaneously). After the beep, click “OK” in the window that appears.
An icon in the form of a crossed out “mouse” will appear in the tray on the right side of the taskbar. This means that the keyboard pointer control mode is enabled. This mode is turned off by pressing the same key combination.
The control itself is performed using the numeric keypad on the right side of your keyboard, namely using the arrow keys.
If the indicator Num Lock is active (lit green), then press the “Num Lock” key. If the indicator is not active, then keyboard control is available. Remember that you can use the Enter key instead of double-clicking the mouse.
Sometimes, for greater convenience when working, there is a need to configure the mouse buttons or, conversely, disable some of them.
Often, accidentally pressing the wheel can interfere or confuse you when working with a document, and sometimes problems even arise. All this can be solved by reconfiguring your gadget.
If your device has a standard set of keys, then its settings can be adjusted thanks to "Control Panels", and if there are additional buttons on it, then it will be easier to do this using the special program X-Mouse Button Control.
Now in more detail about both options.
Contents:
Standard setting
To begin, open the Start menu and go to "Toolbar", which allows you to change the settings and functionality of your computer.
Going to the section, select the item “Mouse”.

A window with gadget properties will open. It will be possible to change the assignment of the buttons - this function is intended for those who have a left-handed dominant hand.
It is worth noting that it is better for left-handers to purchase ones whose shape is symmetrical, then the exchange will be convenient.
It is also possible to adjust the double-click speed using a special scale, which is sometimes set in a completely unusual way.

Button properties and selection
If you go to the following tabs, you can familiarize yourself with other functions. So in “Indicators” you can change the appearance of the “arrow” and completely customize it to suit you.
Some of the options even have animation, and in addition, you can remove or, on the contrary, enable the shadow from the cursor.

They will allow you to debug the speed of the “arrow” movement, and will also provide several additional features: display the pointer trail, hide it while typing, and indicate it when you press the Ctrl key.

Index Options tab
In the “Wheel” tab, it is easy to understand the scrolling of pages so that it corresponds to the user’s desires.
The vertical one is familiar to everyone, and it will help you work more comfortably with text documents or increase the convenience when spending time playing games.
In turn, horizontal scrolling, as a rule, is not present for everyone.
Most often used when viewing, the size of which is not always comparable to the expansion of the user’s screen.

Wheel tab
“Equipment” shows all available information about connected gadgets.
The section includes a report on their status, the drivers they use, and some background information.

In addition to this method of making your own adjustments to the operation of the gadget, there is also another, which also starts with going to "Control Panel".
In it we select, and then the item "Change mouse settings".
Accessibility section
In the open window we see a set of the most optimal settings, among which corrections regarding the color, size and shade of the cursor are highlighted in a separate block.
It is also possible to enable pointer control from and activate the window when you hover over it with the cursor.

Tab Make it easier to use the mouse
This information will help if the manipulator does not accommodate additional buttons; in this case, its settings are provided by the service center.
But if your gadget is significantly different from others, then a simple analysis of the properties will not do.
Additional buttons
Does not allow you to customize the multifunctional manipulator to suit your tastes.
If your device contains five or six buttons, then, of course, you can use them, but only those functions that are assigned by default will be assigned to them.
In the case of the Microsoft OS, this is a right and left click, scrolling with the wheel and zooming.
There are many ways to reconfigure your mouse, one of which is installing drivers.
However, this option is applicable only for popular manufacturers, whose installations for various equipment can be easily found on the Internet.
These companies include Logitech, Genius, Razer, but what to do if the controller you bought does not bear the brand logo and finding drivers for it is not an easy task?
And even if it is branded, not everyone wants to occupy computer memory with its settings.
In this case, the X-Mouse Button Control program, which weighs only 4 MB, comes to the rescue.
Quick installation and ease of use will allow you to reconfigure the gadget for yourself in a matter of minutes using the program. A distinctive feature of the X-Mouse Button Control is the presence of layers. Initially there are only two of them, but the user can increase their number many times more at any time.
The need for them lies in maintaining a certain type and using them at the right time.
So, using layers, having previously prepared them, you can easily work on the Internet, and then switch to designing text documents or even go into the game.
You just need to designate hotkeys for changing layers and they will be available for use at any time.
As for the latest versions of the software product, this transition occurs automatically.
The most popular and popular functions of the program include:
The advantages of the application include its ability to work compatible with all current operating systems, as well as a user-friendly interface and, of course, a huge range of functions.
Analogues include Mouse Clicker - a utility with almost the same number of capabilities, as well as an application that allows you to record the actions of the manipulator and then play them back.
Indispensable for constant routine work that requires monotonous, identical actions.
In addition, it can also enter text from the keyboard and can even double-click the cursor in different areas of the screen at the same time.
Mouse Recorder Pro has been developed to match it, which also automates the recording of movements and clicks, but at the same time saves the received data in a macro, which allows you to use this technology repeatedly.